All You Want To Know About SBI NoQueue or NO QUEUE Mobile App

Finance Guru Speaks: Have you heard about SBI NoQueue or NO QUEUE Mobile App? Do you know how it will make your life convenient? Read on to know all about this App.

The idea behind this App is to make your life easy before you even reach to your Branch. It is used to reserve your booking slot before reaching Bank branch. It is a unique App to enable customers to book a Virtual Queue Ticket (also known as e-Token) for select services at select SBI branches.

You can generate e-Token before reaching the branch, thus avoiding waiting in the queue at the branch and saving valuable time. This App also conveys the estimated waiting time, number of customers ahead and a map showing the direction to reach the branch. Customers will be updated about their position in the queue through instant alerts. This service is available for all SBI and Non SBI Customers. Customers can book a virtual ticket only during the branch business hours.

To download SBI NoQueue App from Playstore, click HERE


It works in 3 Steps :-

1. Choose your Service like Despoit Cash,Open FD, NEFT Transfer etc.
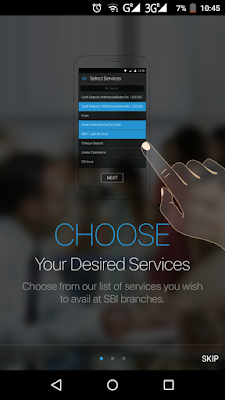
SBI NoQueue - Choose Services

2. Select your Location (by switching ON your Mobile GPS) and accordingly select your nearest branch.
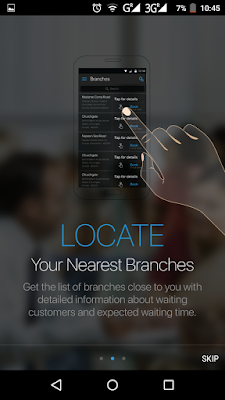
SBI NoQueue - Locate Branch

 3. Get your Virtual Ticket or e-Token.
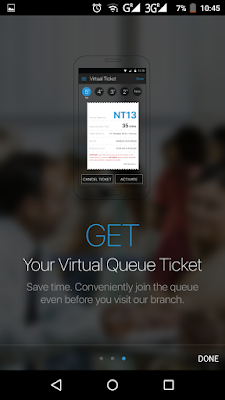
SBI NoQueue - Get Virtual Queue Ticket

Once you download, you need to first set the Language :-

OnlineSBI Account Locked - How To Online Reset or Recover SBI Internet Banking Login Password?

Finance Guru Speaks: What is your worst nightmare! Forgot your SBI Internet Banking Login Password and your Internet Account got locked due to maximum incorrect login attempts. And, you are reluctant to go to your Bank Branch to sort out the issue.

Well, things are quite easy even in Nationalised Banks, all thanks to the Core Banking Technology.

You can reset your login password online by using any of three ways :-
    a. Using ATM Card details.
    b. Using Profile Password.
    c. Without ATM Card details & using Profile Password.

Below are the Steps to Reset your Login Password Online without visiting your Branch :-


1. Open OnlinseSBI Login Page and click on Forgot Login Password link, as shown below:

2. As shown in next page, click on Next Step button:
3. As shown below, provide all the details:
4. Once you click on Submit as shown in above Screen, you will receive One Time Password (OTP) on your registered Mobile No.

SMS Contents: OTP for Trouble Logging in-Forgot Login Password is:4297xxxx. Do not share it with anyone.

5. Provide this OTP in the next screen and click on Confirm:
6. In the next screen, choose any one of the options as per your convenience and click on Submit:
7. Suppose, you have chosen Using Profile Password option (because you still remember your Profile Password! :-)), then provide the correct Profile Password in the next Screen:

8. In the next screen, provide new Login Password and make a note of it.

Congratulations!! You have successfully reset your Login Password Online using Internet Banking features.


 Images Courtesy: OnlineSBI Website


 Please share this article over social networks. For more Learning, Please visit "At A Glance" Section.

How To Link Aadhaar Number Online with SBI Bank Savings Account?

Finance Guru Speaks: This article will provide details on how you can link your Aadhaar No. online with SBI Bank using Internet Banking.

Below are the steps to link your Aadhaar with SBI Bank Savings Account:-


1. Login to OnlineSBI Account with your Username/Password.
SBI Online Banking Login Page
Click to enlarge - SBI Online Banking Login Page

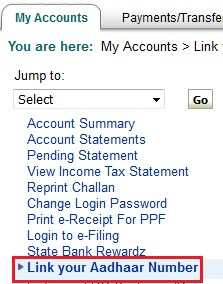
2.       In the Home page, click on My Accounts > Link your Aadhaar Number link as shown below :-

Link Aadhaar Number Online to SBI Bank
Link Aadhaar Number to SBI Bank

Now, provide your correct Aadhaar Number in the next page and click on Submit button.

OnlineSBI - Aadhaar Number Registration
Congratulations!! You have linked your Aadhaar Number online with your SBI Savings Bank Account.

Please note :-

- Aadhaar number can be updated with Saving account only. You can link your Aadhaar number only.

- On submitting, your request for seeding Aadhaar Number into your account with the Bank will be processed, basis the validation with NPCI / requisite authorities.

- This request will not be processed, if details in Bank Account do not match with details available with UIDAI.

- The Bank is not responsible for any erroneous updation of Aadhaar Number in your account.

- If your Aadhaar number is already seeded in your account with SBI Bank and you wish to change the account, please visit the nearest SBI Branch with your Aadhaar Card.

- Please do not submit parallel requests for Aadhaar seeding using more than one medium. If you have already submitted your request for Aadhaar Card linking either with Aadhaar linking form at bank branch / SMS Banking / Netbanking, please wait for the failure message before again submitting your request through any of these mediums.

 Images Courtesy: OnlineSBI Website


 Please share this article over social networks. For more Learning, Please visit "At A Glance" Section.

All You Want to Know About UPI Unified Payment Interface App

Finance Guru Speaks: This article will provide you details about revolutionary RBI's Banking App, called UPI or Unified Payment Interface. Gone are the days of using your Smartphone just for selfies, browsing, video chatting etc. Now you can use your Smartphones as your Mobile Bank at ease. So you can have Banking system in your Pocket!

RBI (Reserve Bank of India) has launched futuristic online payments solution - Unified Payment Interface. It is the advanced version of IMPS (Immediate Payment Service) funds transfer service.
RBI UPI - Unified Payment Interface

No need to download multiple Banks Apps. With UPI, you need to download only one App. This interface will group all the banks together and you can make transactions using this single App.

To download it from Playstore, you need to wait for next couple of months. I will share the download link, once it is available. Watch out this blog for more details!


How does it work?


If you want to buy a product from an online merchant, say Amazon using your smartphone, you will have to give your virtual address like 9876538789@hdfc and money will be requested by the merchant from it. You just need to provide your username and password to complete the transaction.

UPI - Make Payments and Send-Receive Money

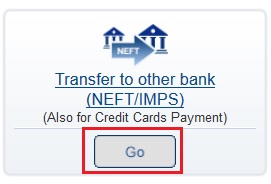
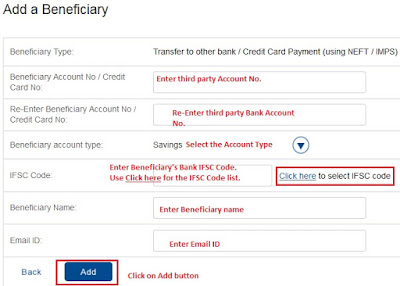
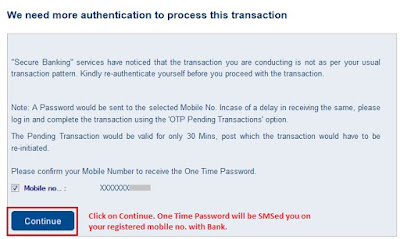
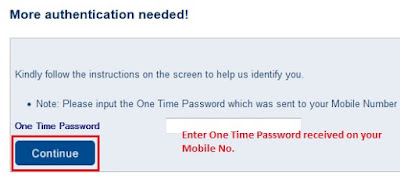
Payment Transfer using RTGS - How to Add Beneficiary using HDFC NetBanking?

Finance Guru Speaks: This article will provide you information on how you can add a beneficiary for the purpose of payment transfer to other banks through RTGS using HDFC NetBanking facility.

Steps to follow to add beneficiary for payment transfer to other bank accounts through RTGS:


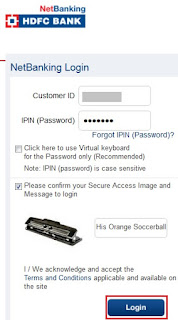
1. Login to HDFC  NetBanking Account with your Username/Password.
HDFC NetBanking Login

2. Once the page is opened, go to Funds Transfer section as shown below :

HDFC NetBanking Funds Transfer
Click to enlarge - HDFC NetBanking Funds Transfer

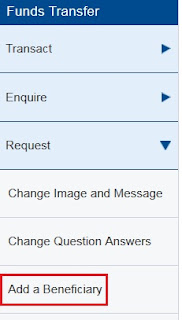
3. Under Funds Transfer -> Request section, click on Add a Beneficiary link :
Add a Beneficiary in HDFC
Click to enlarge - Add a Beneficiary in HDFC

4. In the next page, click on Transfer to other bank link as shown below :
Select RTGS Transaction Type
Click to enlarge - Select Transaction Type

IMPS - How to Transfer Funds Using HDFC NetBanking?

Finance Guru Speaks: This article will provide you information on how you can transfer your funds or money to other banks through IMPS using HDFC NetBanking facility. For making an IMPS Funds Transfer, you need to first add IMPS Payment receiving Beneficiary in your NetBanking account.

Read article - Payment Transfer using IMPS - How to Add Beneficiary using HDFC NetBanking? to know about how to add a Beneficiary for IMPS Payment Transfer in HDFC.


Once you added the IMPS beneficiary, you need to follow below steps to transfer the funds.


Steps to follow to transfer funds or money to other bank accounts through IMPS :


1. Login to HDFC  NetBanking Account with your Username/Password.
HDFC NetBanking Login
2. Once the page is opened, go to Funds Transfer section as shown below :

HDFC NetBanking Funds Transfer
Click to enlarge - HDFC NetBanking Funds Transfer
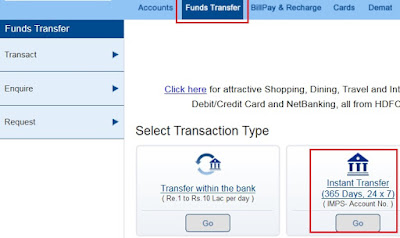
3. Click on Go present in Instant Transfer section as shown below :

HDFC Instant Transfer IMPS
Click to enlarge - HDFC Instant Transfer IMPS

5 Tips for Applying for Personal Loan for Business

Finance Guru Speaks: When as an entrepreneur you decide to begin your own business or look to expand your current business, the major challenge is more often than not is, gathering a loan for it. Although you may be full of innovative ideas for shaping your own business, without capital you have nothing to begin with. This is when personal loans come in very handy. However, as there are numerous loan options for small and medium enterprises (SMEs), such as HDFC Bank personal loan, Bajaj Finserv Personal loan, SBI Personal loan, you need to keep in mind several aspects before applying.

5 Tips for applying for Personal loan for Business
1. Get your business plan in place

Firstly, you need to prepare yourself to receive a loan approval and sell your business idea as a viable one. So go ahead and create an impressive business plan. Ideally, a good business idea should talk about the company's products or services, marketing strategy, financing requirements alongside a comprehensive and detailed description of the business. This should talk about the use of funds among other aspects. However, the most important aspect of your business plan is to lay down the future vision of the enterprise. Make sure that you work hard at this to come up with an innovative business plan that financial organisations would be looking to invest in. Also, you can consider insuring your business as an added advantage as financial institutions look for organisations which are insured and safe to invest in. Remember there is tremendous competition in the market and you have to give the bank adequate reasons to choose your business plan over another. 

2. Learn to Prioritise

When you plan to expand or start your own business, always think ahead.  Decide in advance the kind of capital you will need. It is advisable to not reach out to a bank without any financial backing. If you can manage to save a certain amount, let the bank or organisation know that you have set aside a certain amount as capital to help kick start your business. While you create and chalk out your business plan, set priorities for the segments that need financing and shape your business plan accordingly. Do not make provisions for unnecessary expenditures, as this will increase your personal loan requirement for business purposes. Be sensible and come up with a well-structured and systematic business plan. 

3. Study all available loan options

When you plan to apply for a business loan, it is always advisable to do some background research.  Instead of applying for a loan outright, review the various options that you have and learn more about the banks that lend commercially.  Read up on the guidelines and procedures currently in place when applying for a business loan. Different organisations have different criteria for approving loans for businesses. The tenure of the loan is also an important aspect that needs to be looked into. Once you start your research, you will find a plethora of options to choose from.  Available loans can have various tenures like short term (up to 2 years), intermediate (2 to 5 years) and long-term (more than 5 years).  Hence, you can choose which plan suits your business requirements as the interest varies with each type of loan. 

4. Choose the amount that you need and can comfortably repay

Be smart and plan well, leaving no room for additional expenses. Remember that you have to pay back the loan amount with interest so apply for a loan amount that you are comfortable with and can pay back within the allotted time, while simultaneously taking care of other expenses. 

5. Create an impressive profile for your business

When you decide to take a loan to expand or start your business, put your financials in place to ensure that the banks are satisfied with their background check. Ensure all the company accounts are in order. If you can add a few impressive references to your business plan it will only add to your credibility and make your case stronger.
Work on building a smart, compact and well-rounded business structure and ensure all the personal loan application requirements are met so as to increase your chances of bagging the loan you desire. 
 

 Please share this article over social networks. For more Learning, Please visit "At A Glance" Section.

Payment Transfer using IMPS - How to Add Beneficiary using HDFC NetBanking?

Finance Guru Speaks: This article will provide you information on how you can add a beneficiary for the purpose of payment transfer to other banks through IMPS using HDFC NetBanking facility.

Steps to follow to add beneficiary for payment transfer to other bank accounts through IMPS :


1. Login to HDFC  NetBanking Account with your Username/Password.
HDFC NetBanking Login

2. Once the page is opened, go to Funds Transfer section as shown below :

HDFC NetBanking Funds Transfer
Click to enlarge - HDFC NetBanking Funds Transfer

3. Under Funds Transfer -> Request section, click on Add a Beneficiary link :
Add a Beneficiary in HDFC
Click to enlarge - Add a Beneficiary in HDFC

4. In the next page, click on Transfer to other bank link as shown below :
Select IMPS Transaction Type
Click to enlarge - Select Transaction Type
5. Now, fill all the details correctly :
Fill Beneficiary Details
Click to enlarge - Fill Beneficiary Details


6. Review the details and Click on Confirm on the next page.

7. For authentication of this operation, click on your Mobile no. as shown below and click Continue:
HDFC Bank Authentication
Click to enlarge - HDFC Bank Authentication

8. Enter the One Time Password received on your Mobile through SMS and click on Continue button :
Enter OTP for Authentication
Click to enlarge - Enter OTP for Authentication


Congratulations!! You have successfully added a Beneficiary for Payment Transfer to other bank accounts through IMPS using HDFC NetBanking.


Images Courtesy: HDFC Bank

  
 Please share this article over social networks. For more Learning, Please visit "At A Glance" Section.